A few weeks ago I wrote a post about using my iPhone on an overnight hike. Regrettably this did not result in Apple swiftly getting in touch and insisting that I take up a role with them as their official photographer. In fact all it did yield was some people asking me how I actually got the shots to look like they did.
Now clearly, only an idiot would give away their trade secrets…so here I go.
It’s not about the technology…no wait…it is!
Earlier this year I upgraded from an iPhone 6 to an iPhone 12 Pro. Now I can promise you that if you have an older phone, then the tips I’m going to give you will help you get better photos…but I also know that if I had taken these photos on my old phone, they wouldn’t have looked anywhere near as good. And besides, the battery would only have lasted for the first 35 minutes of the hike.
Composition and technique help…but so does millions of dollars of Research and Development! So as with most things in photography, the more money you throw at your equipment, the more people say ‘How did you get that photo?!’
But telling people you can take better photos by dropping $1,200 on a phone seems like the sort of advice that inevitably leads to a global financial crisis (albeit one that is beautifully captured in photos on Instagram), so here are some tips that won’t cost you a cent!
Light bro
We’ve all had that experience of incredible light. Whether it’s the last fading light of a summer’s day, or the first golden rays in the morning, or that incredible light that comes after a big rain storm. You can take pretty much any photo in that light and it will look amazing. Why? Because the light is being diffused. Whether it’s because the sun is just rising or setting and so is only hitting you with about 10% of its light…or because the light is being reflected around by moisture in the air. The result is beautiful soft light.
The antihesis of this is pretty much any photo taken in Australia from 10am – 5pm, where the brutal sun just a makes everything look flat and unispired.
So the first step to getting a great shot on your phone is to get up nice and early when that light is at its subtle best.

Setting the exposure
If you have your phone with you…bwah ha ha! Just kidding. Of course you have your phone with you! So seeing as you have your phone with you, load up the camera and find a shot where there is something bright (a window or light), and something dark (perhaps an open cupboard or shaded area), and then put your finger on either of these spots. When you put your finger on the bright part, you should see everything else get a little darker…and when you put your finger on the darker part, you should see that the everything gets brighter (to the point where the bright part gets really bright).
I know what you’re thinking ‘Cool story Chris…but how does this help me?’
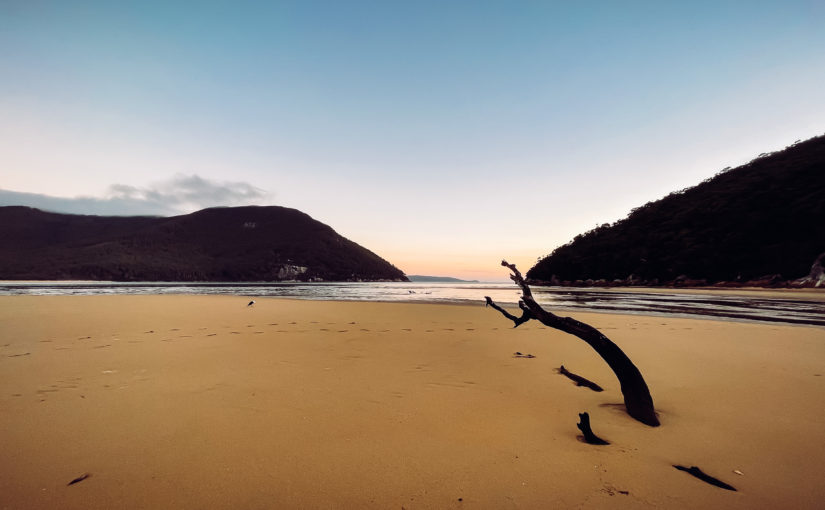
Well, the reason this is happening is because normally your phone is looking at a scene and trying to find the right balance so that the bright parts aren’t too bright and the dark bits aren’t too dark. It’s a bit like making a decision by committee, you don’t come up with the best result…just the one that people hate the least. When you put your finger on the screen you are telling your camera ‘This is the part that I want you to get right…and everything else can just work around it!’ So for example with this shot, it’s the colour in the sky that draws you in.

But if I had just taken this photo as the phone wanted to take it, it would have tried to capture the detail in the shadows on the log in front, or the hills, and so would have added a lot of light…and in doing so, would have made the sky a white mess. So I put my finger on the sky, told the phone that this is what I want it to get right, and this is the result.
Tragically I have missed out on highlighting the beauty of the birdshit on the log…but these are the sacrifices you have to make as a photographer.
Similarly if you’re ever at a gig or a concert and someone is up on stage with a spotlight on them, press on the screen where their face is so that the phone knows to expose for that and it will make the background really dark, but have them perfectly lit.
There was a distinct lack of spotlights on the hike we did…but there some burnt out tree stumps…so exposing for the person’s face in the full light, made the blackened stump fall away to a perfect black background.

Composition
I think we’ve all had the experience of walking into an incredible natural scene, being overwhelmed and taking a photo…then thinking “Wait…that looks a lot more shit than I remember!” I call this the ‘Every phone photo ever taken of the moon’ phenomenon.
My non-scientific belief is that the experience you have is of feeling humbled by all that you’re taking in, but your phone can’t replicate that feeling (an iPhone 12 makes you feel many things…but ‘humble’ is not one of them).
My photographic approach to dealing with this is wonderfully contradictory!
First and foremost you need something in the foreground to give the grandeur behind it some perspective.


At the same time…going for the ‘Pano’ approach allows you to take in a larger portion of the scene, while getting rid of a lot of the sky and ground (I think as humans we can see a bit of sky and a bit of the ground and imagine how the rest of the sky and ground looked). Unless the sky or the ground is the part that’s interesting, focus the viewer’s eyes on what you want them to be looking at.

Also, speaking as someone who once had to ‘stitch’ 3 photos together in Photoshop (before this was an automated process)…the fact that you can just wave your camera around a scene and your phone will turn it into something comprehensible, is as much a modern-miracle as any life-saving drug!
Get low
We spend most of our lives walking around and looking at things from between 5-6 ft high. So if you want your photo to get people’s attention, try shooting from a different height. In particular…get low…especially if there’s water around for a reflection!


Getting high can also help your photography…but that feels like a different blog.
Post-production
This may come as a shock…but I didn’t buy a special edition iPhone to take my black and white shots…I actually converted them to black and white in post-production! Similarly, I will almost always adjust the contrast, or pull back the exposure, or raise the shadows, or add a vignette to a photo before I publish them.
The person looking at the photo doesn’t get to smell what I was smelling or hear what I was hearing…so I’ll be damned if I don’t try my best to engage them visually!
All of these options built into your phone, and you can ‘undo’ any change you don’t like. So start experimenting and see what you can do!


If you have access to something like Adobe’s ‘Lightroom’, then you can have even more fun working on your photos…just try to get past the ‘add heaps of ‘clarity‘ to everything’ stage as quickly as possible. Like ‘instant noodles’ and ‘undercut’ haircuts, we all have to go through that stage…but it’s nothing to be proud of.
So there you go…some free tips on how to raise your phone photography game…for everything else, just drop a distressing amount of money on a new phone!
